
Paper Christmas Wreath (mini-tutorial)
After making all the snowflakes for the indoor Winter Wonderland, I started getting into paper folding. Soon I was googling Christmas origami ideas and found this origami Christmas wreath tutorial (after finding this pretty version on Go Origami). The tutorial is in Portuguese but the pictures really tell you the story (and Google translate fills in the gaps!).
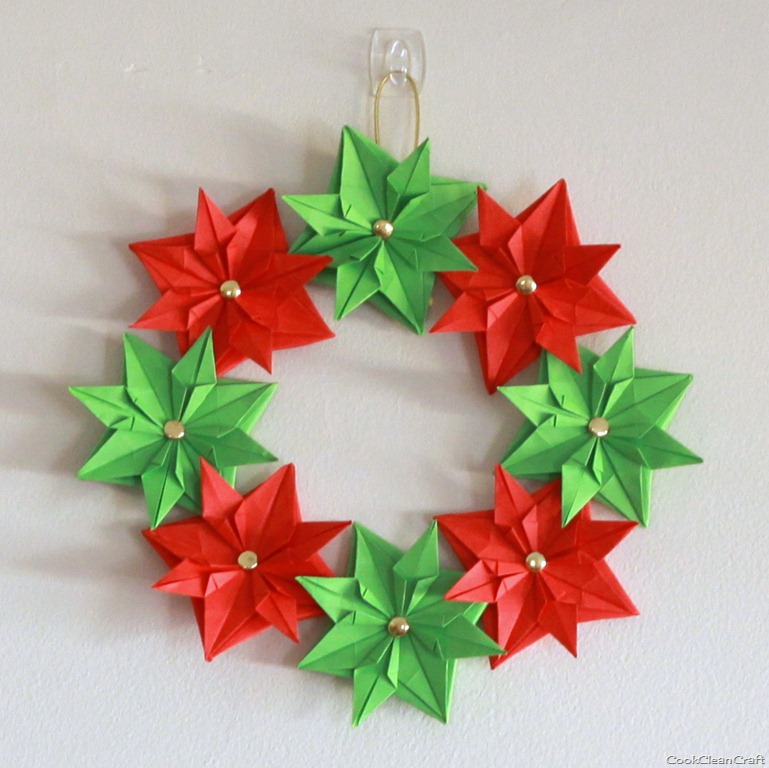
There was a packet of origami paper squares in a show-bag I bought from an arts and craft store a while back. I got the green and red paper out and started folding. (The green was a bit more Kermit than Christmas and the red was a little washed out, but it would have to do!).
The first star took a little while to make, but I got a rhythm going after 2-3 and they became easy enough to make after that.
I finished off my stars with an extra fold to make them a little less square and more star-like. The tutorial doesn’t show how to fold the third and fourth sides without unfolding what you’ve already done, but with a bit of experimenting, I worked out how to do it and saved a bit of time. Here’s a mini-tutorial (as an addendum to the original tutorial):
Materials
8 paper squares
Split pin
Glue
Instructions
1. Follow the instructions for folding the first two sides of the star from the original blog so it looks like this:
")
2. Fold one of the remaining sides up so that the point lines up with where the two diagonal creases intersect, just past the square and the base of the fold is along the bottom of that middle square:
")
3. Fold across that point to line up with the diagonal of the middle square:
")
4. Fold across to the other side:
")
5. Fold out the diamond shape (as per the original tutorial).
")
6. For the final side, fold the last side to line up with the point you just made (with the crease line being at the bottom of the square):
")
7. Repeat the side to side folds to make the diamond:")
")
8. Finish the folds to make your star, and then insert the split pin into the middle.
9. To make the background section of the star less square, turn over your star and clip a small notch in the mid way point of each side of the square (There should be a crease at that point):
")
10. Fold the two piece of each side of the square, creating a more acute angle on the point of each square:
")
11. And there you have star:
")
12. Make 7 more stars and glue them together to form a wreath, tucking the long point of one star under the point of the next star, but above the square section to sandwich it in place.
")
Rather than glue on a loop, I just slipped a loop of cording over one of the split pin “legs”

Another cute homemade Christmas decoration!
Cute! I am pinning this to try next year. Thanks for sharing this with us:)
I’m having trouble getting from the 2nd to the 3rd step in the original tutorial. Am I missing a step? Since the original isn’t in a language I speak, I wonder if it’s something in the instructions I’m not understanding. Any way I can convince you to do the full tutorial?
Hmmm, I don’t have any paper at the moment to do a full tutorial, but you need to make the kite-type folds from the second photo for each corner, unfolding the paper each time. Then you fold the paper in half from corner to corner and tuck the paper in along the creases to create the shape in picture 3. If I get some time in the next few days, I’ll try to get some photos of those steps.