Advent Calendar Craft-Along: Preparation
This is Part 2 in the Advent Calendar Craft-Along. For more information and inspiration, read the introduction post here.

The concept
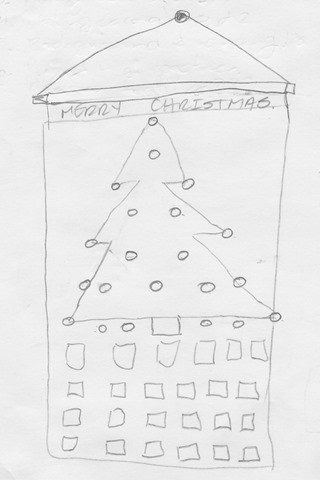
I’m making a felt Christmas tree, with little pockets below the tree. Each day, we’ll pull out a decoration from the pocket (and maybe a chocolate or two!) and hang it on a button on the tree – slowly decorating the tree as Christmas approaches. If I feel really inspired, maybe I’ll have Merry Christmas appliqued across the top (hmmm, let’s not get over-confident here!).
Here’s my dodgy, drawn-by-an-engineer sketch (not to scale):
I’ll need 24 decorations to hang. Hmmm, what are they all going to be? Here’s my first thoughts:
- 1 star for the top of the tree (last one to go on!)
- 4 presents under the tree (one for each family member)
- 4 baubles (with a name on each one)
- 2 candy canes
- 1 angel
- 1 Santa
- 2 bells
- 1 gingerbread man
- 1 gingerbread lady
- 2 sprigs holly
- 1 snowman (resist the urge to make Olaf!)
- 2 strings of lights
- 2 pieces of tinsel
OK, I’m pretty sure that adds up to 24! So that’s the idea. The next step…
Getting supplies together
This is a stash-busting project for me. Here’s the supplies I can think of. I’m sure I’ll need to pick up a few extra things as I go:
- Green felt yardage for the tree (leftover from my Felt Car Play Mat)
- White quilter’s cotton for backing
- Felt sheets – red, green, yellow, white, brown
- Embroidery thread in matching colours
- Red bias binding to finish off the edges
- 24 buttons
- Dowel for hanging
- Ribbon for hanging
- Sewing thread
- Sewing machine
- Hand needles
I’m going to confess I’m cheating for the numbered pockets. I picked up this advent calendar placemat in the after-Christmas sales last year. I’m going to cut it up rather than appliqueing or embroidering my own numbers for the pockets.
Now, how am I going to get this all done by the end of the month? Time for…
The Plan
- Cut out the tree shape and sew it to the backing fabric. This will feel like I’m making progress and hopefully keep me motivated.
- Sew all the numbered pockets to the backing fabric.
- Sew buttons onto the Christmas tree.
- Bind the edges of the backing fabric and add pocket for dowel and ribbon to hang.
- Start making decorations. If I get the first 4 steps done in a week, then I’ve got 3 weeks to do the decorations – so I need to make 8 per week – eek!
- (Optional, if I have time) Applique Merry Christmas across the top.
OK, that sounds like a lot of work, but I’m sure once I get into it, it won’t take long (no more procrastinating!). And if I’m get behind, it doesn’t matter if I finish off the decorations in December.
What plans have you made for your Advent Calendar?


